
This page details the flashing and use of a Devo 7e transmitter with our range of robots. If your Devo 7e is not flashed with the Deviation firmware please follow the flashing guide first.
Devo 7e Binding Guide
Preparing The Robot
Ensure your robot is turned off. Locate your Bind Plug and insert it into the Bind Socket on the receiver/speed controller unit. The Bind Socket is the plug with 2 pins attached on the edge of the unit.

Preparing Your Devo 7e
Turn on The Devo 7e and ensure you are at the main screen. Press the ENT button.
‘Model menu‘; should be highlighted, Press the ENT button again.
Now ‘Model setup’ should be highlighted, Press the ENT button again.
Press the down (DN-) button until you see 2 options next to each other like this:
[DEVO] [Bind]
Highlight [DEVO] (UP+ and DN- key), press the R+ key (right) until it says [DSM2]. Now press down to highlight [Bind]
Bind Procedure
It is important when you bind to make sure the transmitter sticks are in their normal positions (allow the springs to centre all sticks and have the throttle stick down). Turn your robot on, the receiver unit should have a rapidly flashing orange light. Press enter on your Devo 7e (with the [BIND] option highlighted), wait for the light to go solid (this may take a while, ignore the countdown) and then press enter again.
Check you have control, then turn the robot off and remove the bind plug. Your robot is bound but you likely need to trim your robot, follow the trimming section in the transmitter care sheet.
Note: Some newer Devo 7e’s may not bind correctly with DSMX receivers. A regular fix for this is to bind in DSM2 mode with the ‘Fixed ID’ deleted (Scroll down in the binding menu above).
Devo 7e Changing Model Guide
The Devo 7e is a multiple model memory transmitter meaning it can be used for multiple robots (though only one at a time). Below is a quick guide to changing between models:
Turn on The Devo 7e and ensure you are at the main screen. Press the ENT button.
‘Model menu‘; should be highlighted, Press the ENT button again.
Now ‘Model setup’ should be highlighted, Press the ENT button again.
Now ‘Load…’ should be highlighted, Press the ENT button again.
Use the UP+ and DN- buttons to highlight a new unused model and press the ENT button. Model 1 is the starting model, so the second robot should be bound to Model 2 and so on. You should be back to the screen with ‘Load…’ highlighted and the model you selected in name. Press the EXT key to return to the main screen. From here you can bind your second robot to the transmitter as normal. Do note each model is separate. so you must be on the model specific to that robot before binding and only that model will then control the robot.
Devo 7e Flashing Guide
This flashing guide may be used to upgrade your Devo 7e to use the Deviation firmware which allows it to be used with our robots on the DSM2 protocol. It may seem a worrying task for those new to robots but it is a fairly simple process overall.
Warning:
Please note a small number of newer Devo 7e’s have developed an issue with their firmware after flashing that is preventing them properly running with DSMX gear. Currently this can be seen in either a refusal to bind to receivers in either DSMX or DSM2 mode, or a successful bind but control is not functional.
Preparing Your Devo 7e
Ensure you have freshly charged batteries in the Devo 7e and it is connected to the computer via a micro USB lead into the USB port on the right side of the Devo 7e (Under the rubber USB marked cap).
Preparing Your Computer
For this you will need to download 2 items. 1 the Devention Upgrade Tool and the Deviation Firmware. Both can be found from this page: https://www.deviationtx.com/downloads-new
Download and install the Devention Upgrade Tool by following ‘DFU USB Tool > Walkera > Our Google Drive’ and selecting the latest version. It will be a .zip with an installer for the upgrade tool inside.
Download the latest Deviation firmware by following ‘Deviation Releases > Deviation 5.0.0 > deviation-devo7e-v5.0.0.zip’, extract the .zip file into a new folder.
Some users may find they need to install the appropriate drivers for the Devo, the next step will show whether you need to or not. However to do this simply download and extract the Deviation USBDrv Installer from here: http://www.deviationtx.com/downloads-new/category/161-dfu-usb-tool
Extract the Deviation USBDrv Installer, and run ‘DFU USBDrv Installer-x.y.exe’. From here install the drivers for the ‘DfuSe USB Upgrade’ (Or your relevant drivers if you are using a different tool).
Flashing the Devo 7e
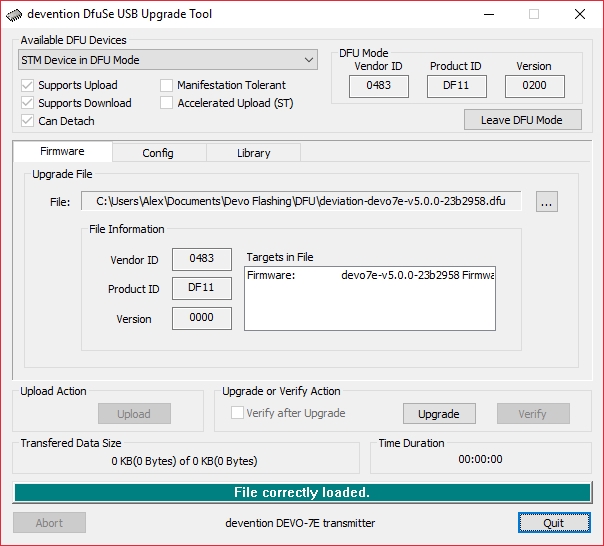
Open the Upgrade Tool. Turn on the Devo 7e while holding the EXT button. The Devo 7e should display ‘Program Update’ and the upgrade tool should register it as a ‘Devo 7e’ transmitter at the bottom of the window (If it does not please refer to the note on drivers above.). From the Upgrade tool press the button with 3 dots next to the box for ‘File:’ locate the folder you unzipped the Deviation Firmware into and select the ‘.dfu’ file. Ensure the screen looks as follows:
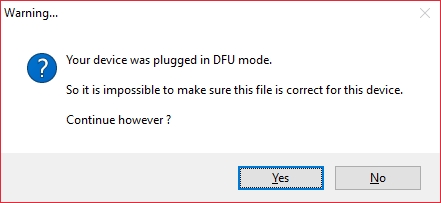
Press upgrade and select Yes when the following warning appears:
Once the Upgrade Tool reads ‘Upgrade successful’ quit the upgrade tool and turn off the Devo 7e, do not unplug it. Turn the Devo 7e back on while holding the ‘ENT’ key, it should display a USB symbol on it’s screen. Windows will open file explorer to the Devo and warn you that it needs to be formatted, select format disk. The following window will appear, uncheck ‘Quick Formatting’ and press Start.
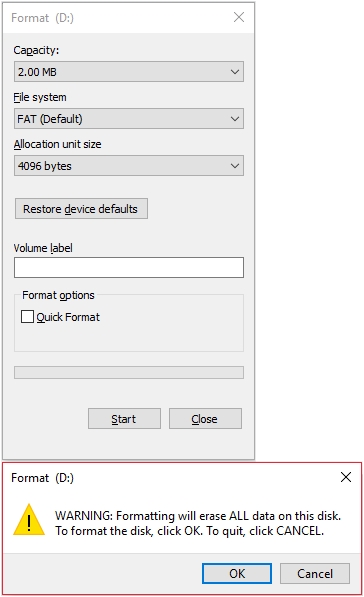
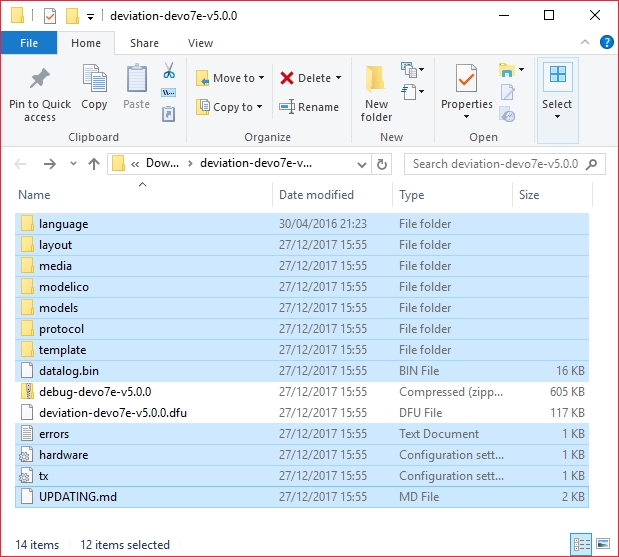
Press ‘Ok’ on the accompanying warning and wait for the formatting complete message to appear. Once complete close the format window, this should leave the file explorer open to the Devo 7e. From the folder where you extracted the Deviation firmware too select all but the ‘.zip’ and ‘.dfu’ file contained within (as shown below) and copy it to the Devo 7e.
Once that is complete safely eject your Devo 7e and turn it off. Disconnect it from the PC. Turn the Devo 7e on and confirm that the splash screen (shown when it starts up) reads ‘Deviation’. Your Devo 7e is now ready for use
Further information on flashing a Devo 7e may be found on the Deviation website: https://www.deviationtx.com/ and a helpful video guide is available here: https://www.youtube.com/watch?v=cj36KytnsQo
This guide is concerning the use of both hardware and software with no affiliation to Nuts & Bots. Nuts & Bots takes no responsibility for any fault in either hardware, software or errors in the procedure (correct at the time of writing) that may result in the transmitter becoming inoperable. When in doubt please follow official guides on the Deviation website.