

Thank you for choosing one of the Nuts & Bots UK antweights! Antweights are one of the most popular weight classes to compete at with plenty of events and manageable size and the Nuts & Bots Ants provide a great starter robot for the class.
Transmitter choice
Your robot is all ready to run once connected to your transmitter of choice.
Transmitter for Flysky FS2A AFHDS: The robot runs on Flyskys FS2A AFHDS protocol. For this protocol the Flysky FS-i6 is recommended as a great entry transmitter. It is able to be connected to multiple robots as well if you ever add to your team. This transmitter is also available under the brand Turnigy TGY-i6. There is a large variety of other transmitters available including the Turnigy TGY-i6 or the Radiomaster Zorro.
Battery: If you plan on fitting your own LiPo Battery the robot can happily run this without any changes needed. Simply connect a 2S (7.4V) LiPo Battery and pair it with a suitable dedicated LiPo battery charger. Recommended size is 120mah-300mah though always check the specific battery dimensions before buying.
Nuts & Bots is always available to provide support in helping you find your components and set up your robot if you need advice.
Competing
Our ants are fully rules compliant to the latest ruleset and should be able to be entered into all events for the class that follow the main AWS ruleset. Our friends over at Bristol Bot Builders keep a calendar of events in the UK that can be used to find events to compete at (https://bristolbotbuilders.com/events/). There may also be more local event organisers for your area you can find on social media!
Spares for your robot can be found on either the Nuts & Bots store or the Bristol Bot Builders store for the electrical parts. If you need help finding any or need some advice Nuts & Bots is happy to help.
Battery Care
Your robot ships with a NiMh 150maH 7.2v 6S Battery. While this is not the standard style of battery for their class due to being heavier than an equivalent LiPo they are also much safer and resistant to damage. Unlike a LiPo they are not damaged by being run too low and can be charged back up again.
WHEN TO CHARGE: Antweights do not carry a voltage cut-off or alarm and should be charged once it has noticeably slowed or after use. Ants are typically made to run for 3 minutes at a time though up to 10 minutes running is reasonable.
HOW TO CHARGE: The provided charger is a USB charger, simply plug the battery into it and the charger into a USB port (A Wall adapter is recommended). If charging from empty it should take approximately 20-30 minutes to full. When running in a competition it’s recommended to charge between each fight to keep the robot running best. The NiMh will heat up during charging and should be disconnected if it gets excessively hot or after 30 minutes.
BATTERY SAFETY: A LiPo safe bag is provided with the robot and is recommended to charge in this, this may be a requirement at some events despite not being LiPo. If the battery is physically damaged it is recommended to stop using the battery and dispose of it at any recycling centre that handles batteries.
Binding
Ensure your robot is turned off and make sure the transmitter sticks are in their normal positions (allow the springs to centre all sticks and have the throttle stick down).

BINDING YOUR ROBOT: Turn the robot on while holding the button on the receiver, the light on the receiver should start to flash. Follow instructions for your particular transmitter to put it in bind mode, wait for the light to go solid or a change in how it is flashing and exit bind mode on your transmitter. For the FSi6 this is simply by turning the transmitter on while holding the BIND button. Some transmitters may require turning the transmitter off and on after the bind procedure before you have control.
Check you have control, then turn the robot off and remove the bind plug. Your robot is bound but you likely need to trim your robot.
Trims
Sometimes your robot may require trimming if the wheels try and turn on their own or the lifter/grabber may not go all the way down. These are fixed with trims that adjust the signal sent from the joystick. Your trim controls are the buttons immediately to the side and below the joysticks. If your robot is trying to steer left or right simply press the trim button in the opposite direction on your steering stick until it doesn’t, the same applies to the forwards and backwards. The easiest way to do this is to position the robot the right way up but with all wheels lifted off the ground. Push forwards on the stick, if they do not start moving at the same time make a note of which way the robot would be turning and click the steering trim in the opposite direction. Keep repeating until both wheels begin turning at the same time. Now move the steering stick on your transmitter, if both wheels do not start moving at the same time check if the wheel that is moving first is going forwards or backwards, click the trim for forwards and backwards in the opposite direction. Keep repeating until both wheels begin turning at the same time.
If your lifter or grabber is making a loud buzzing sound (Often when the servo is blocked from moving to where it is trying to) when closed or needs its position adjusting (Such as a flipper not going all the way down) use the trim buttons next to the throttle stick until you cannot hear any noise from the motors or the position is correct.
Adding a Hat Module
Upgrading your Pusher with a Hat Module is a simple, easy addition to give your robot an extra kick in the arena. Simply unscrew the existing lid of the robot, then take the BROWN/RED/ORANGE lead and connect to the receiver as shown. Take note of which way around the wires are and double check before proceeding. Then simply screw the Hat Module on top in place of the lid, it can help to try and coil the lead with the electronics in front of the robot so it is out of the way.

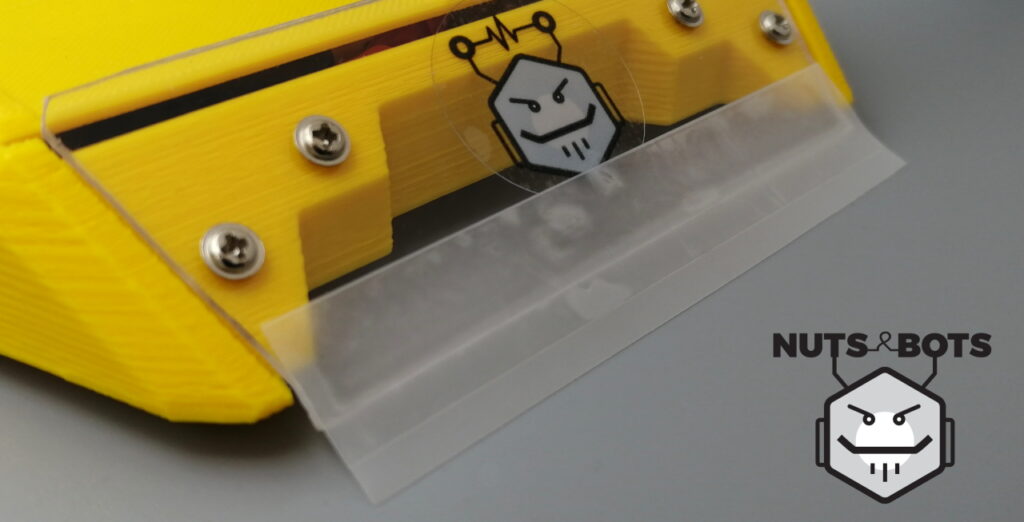
Acetate
With the TPU armour this is often personal preference as they are already good at getting under other robots but may still help. Acetate is thin flexible plastic about the thickness of a piece of paper, used to help get under other robots. Cut a thin strip of Acetate out and using double sided tape secure it to the front of the robot as in the picture
The Components
Here’s a quick break down of all the parts of your robot! Spares can be found on either the Nuts & Bots store or the Bristol Bot Builders store.
Antweight Robot Parts List |
||
|---|---|---|
| ABS Chassis | Nuts & Bots Chassis | The rigid ABS core of the robot that houses all the components. ABS is fairly strong and resistant to damage as well as being lighter than many other plastic choices used in the class. |
| NiMh Battery | 150mAh 7.2V 6S NiMh Battery | This stores the energy needed for your robot to fight with. NiMh is heavier than the typical LiPo but is safer for starting out in fighting robots. |
| Receiver | FlySky 4 Channel Receiver | The receiver is the part of your robot that talks to your transmitter allowing you to control it. The 4 channel means it can pass on 4 signals (Up/Down and Left/Right on each stick) from your transmitter. |
| Speed Controller | BBB Edition Antweight Dual ESC V3 | The Electronic Speed Controller (ESC) takes the commands from the receiver and controls the motors according to them. The Dual means it can control 2 ‘channels’ of motors at a time (Left and Right Side). |
| N10 Drive Motor | 600 RPM BBBxN&B N10 Gearmotors | Small motors with built in gearboxes that move your robot. N10 is the standard for ants with plenty of power for the size. |
| Switch | SPDT Slide Switch | A Single Pole Double Throw Slide Switch used to power the robot on and off. |
| TPU Armour | Nuts & Bots TPU Armour Wrap | The TPU Armour of your robot is intended to absorb energy from hits by squishing and compressing rather than transmitting the energy straight to the chassis. It also fills up space between the important core of your robot and the opposing robots attack, meaning they have a lot of material to chew through to get to the core and damage anything important. While robust the intent with TPU armour is that all the damage is taken by the armour rather than going through to the chassis meaning it will be damaged over time in competitions. Spares can be ordered from Nuts and Bots or files from the Robots store page can be used to print your own. Recommended 4 Walls with 12% Infill. |
| Servo | ALZRC DS452PM Servo | A Servo is like an ESC and Motor in one but rather than trying to go to a certain speed it tries to go to a certain position. This control is great for things that don’t want to be continually moving and often want to stay in a set position like Grabbers, Lifter and Flippers. A variety of servos belonging to the ‘450 Heli’ class of servo are popular in ants. |
| 34mm Wheel | BBB 34mm Antweight Wheel | A fairly standard wheel with a Rubber Tyre mounted on a plastic hub. For serious competition it is recommended to superglue the tyre on. |
Fixing Your Robot
It’s only natural in this hobby that at some point your robot is going to be damaged. Here’s a few quick tips on fixing:
Tips for Robot Diagnosing |
|
|---|---|
| Before Fixing | Before any fixing it’s always advised to charge your battery up as a low battery can cause issues itself. Next if the issues are to do with control or how it is responding to the transmitter try binding it again, an easy step that can sometimes solve simple problems. Having a cradle or something under the robot so it’s wheels are off the ground is also recommended for safety. Your transmitter will need to be on for most of the testing. |
| Physical Damage | The majority of the damage a robot will face is physical so it’s recommended to keep parts on hand for competition to simply swap out when damaged. However if spares aren’t available a hot glue gun and tape can go far in keeping a robot in a competition. Many robots have won a tournament barely held together with those. |
| Motors | Motors are one of the more vulnerable components as they are directly attached to wheels, a prime target for any opponent to attack. If they don’t seem to be rotating well they might have debris in. Blowing into the gearbox while gently turning it by hand can help clear it. If it feels very difficult to turn or the shaft feels very wobbly it may be time to replace. If a motor feels okay but won’t turn the issue normally lies in the ESC but it can be easily checked by disconnecting the motor and putting power across the terminals such as with a battery can let you know if the motor is okay. |
| No Control or Noise | If you turn your robot on but there is no Control or even noise from the robot this is often the receiver. If a rebind doesn’t fix it check for any lights on the receiver, if there is a bright light then it’s likely an ESC issue if no light comes on it’s likely needing a receiver swap, this is also a good starting point as it’s the easiest component to swap requiring no soldering. If there is still nothing it is likely the ESC is the issue instead and will need swapping. |
| Noise but No Control | This is most likely an issue with the ESC or the motors. The motors can be checked as above but the ESC will require a swap. |
| Motors only moving in one direction | If when controlling a motor it will only go in a single direction this is typically an ESC issue, unfortunately this is normally a fault inside the driver chip of the ESC and not fixable with any ease. |
| Servo | Servos being self contained units are hard to fix yourself if they have failed, often a straight up swap is recommended. Though often keeping failed servos can be helpful as good parts of one may be helpful for fixing others, particularly the gears if they fail mechanically. |
| Component Swapping | One of the trickiest parts about fixing a robot with a serious issue is that it can be hard to know what component has actually gone wrong. The best way to narrow down the cause is by swapping a component one at a time with a known good one. I always start with the receiver as it can be easily swapped without any soldering. If the problem disappears then you know the problem was there, if it stays you can work down the line. For example if motors are behaving oddly but feel okay and stay behaving oddly after a receiver swap the issue is most likely the ESC. In ants this normally only takes swapping a receiver, servo or ESC out but the more complex the robot the more helpful this technique can get as components can start affecting others you wouldn’t expect if they fail. Simply disconnecting others can help as well. If you are trying to diagnose a problem with the drive it may be worth disconnecting a servo just to check it isn’t doing anything and the simpler the robot can be while trying to find an issue the easier it is! |
| Other issues | This is of course not a complete guide. The range of possible faults and nature of the hobby mean there is always a new exciting way for a robot to confuse you. Other roboteers at events are always happy to lend a hand to get a robot back in the arena and Nuts & Bots is available to help diagnose and fix your robot outside of the events themselves. |
Contact
If you have any questions or want some advice please contact Nuts & Bots at: ‘alexshakespeare@nutsandbots.co.uk’.